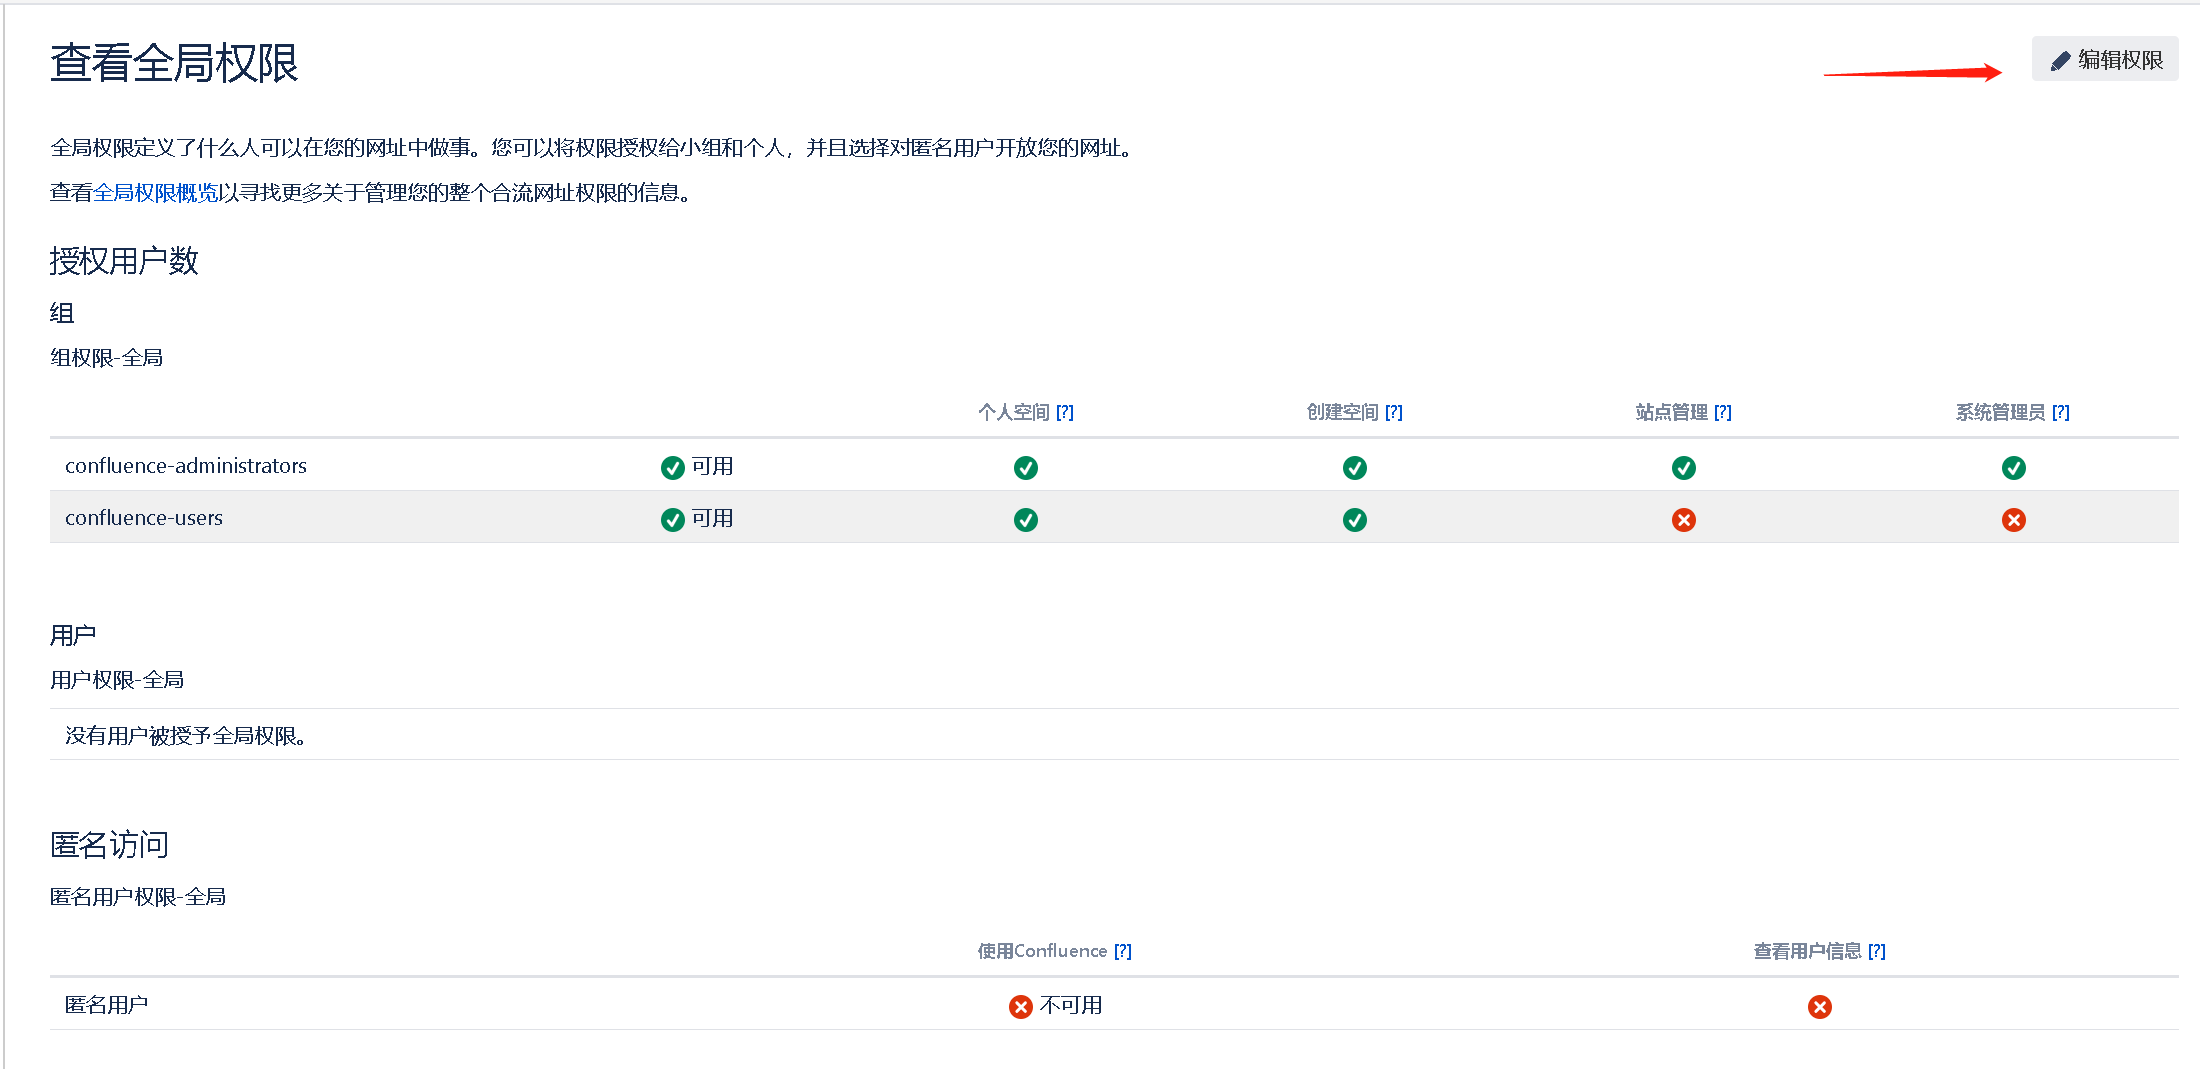
batch_telnet.sh(批量telnet)


#!/bin/bash
#ip和端口
ipaddress=$1
port=$2
#需要执行的次数
total=$3

if [ -z ${ipaddress} ] || [ -z ${port} ] || [ -z ${total} ];then
echo -e “请按正确格式数据参数:’sh batch_telnet.sh ip port 执行次数’”
exit
else
:
fi
countsuccess=0
countfail=0

for((i=1;i<=${total};i++))
do
echo “” |telnet ${ipaddress} ${port} > /tmp/telnet.log
numcount=cat /tmp/telnet.log |grep -e 'Escape character'|wc -l
if [ ${numcount} == 1 ];then
echo -e “访问${ipaddress}:${port}成功,无异常!”
let countsuccess+=1
else
echo -e “访问${ipaddress}:${port}失败,检查ip和port是否正确!”
let countfail+=1
fi
sleep 2
done
succesper=$((${countsuccess}100/${total}))
failper=$((${countfail}
100/${total}))
echo “总共执行次数${total},成功次数${countsuccess},成功比例${succesper}%,失败次数${countfail},失败比例${failper}%”

点击阅读

mysql delete语句使用where in不走索引的问题解决


mysql delete语句使用where in不走索引的问题解决
1、背景介绍:
想要删除某个表中重复行的数据
先使用聚合函数查询到哪些数据是重复的:
select update_time from test_data group by update_time having count(1) > 1;

2、根据update_time数据相同的值找到对应的id,根据主键id进行删除:
delete from test_data where id in (select id from (select min(id) as id,update_time from test_data group by update_time having count(1) > 1 ) as t);

然后查看这个sql的执行计划
explain delete from test_data where id in (select id from (select min(id) as id,update_time from test_data group by update_time having count(1) > 1 ) as t);

1
2
3
4
5
6
7
8
9
root@db 12:16:  [tmp_opa_user]> explain delete from test_data where id in (select id from (select min(id) as id,update_time from test_data  group by update_time having count(1) > 1 ) as t);
+------+--------------------+------------+----------------+---------------+-----------------+---------+------+---------+-------------+
| id | select_type | table | type | possible_keys | key | key_len | ref | rows | Extra |
+------+--------------------+------------+----------------+---------------+-----------------+---------+------+---------+-------------+
| 1 | PRIMARY | test_data | ALL | NULL | NULL | NULL | NULL | 1085134 | Using where |
| 2 | DEPENDENT SUBQUERY | <derived3> | index_subquery | key0 | key0 | 9 | func | 108513 | |
| 3 | DERIVED | test_data | index | NULL | idx_update_time | 7 | NULL | 1085134 | Using index |
+------+--------------------+------------+----------------+---------------+-----------------+---------+------+---------+-------------+
3 rows in set (0.001 sec)

这种方法没有走主键索引,删除耗时:

1
2
root@db 12:27:  [tmp_opa_user]>  delete from test_data where id in (select id from (select min(id) as id,update_time from test_data  group by update_time having count(1) > 1 ) as t);
Query OK, 81241 rows affected (4.669 sec)

3、更改delete删除方法,使用delete inner join的方法:
sql如下:
explain delete a from test_data a inner join (select id from (select min(id) as id,update_time from test_data group by update_time having count(1) > 1 ) as t) d on d.id = a.id;

1
2
3
4
5
6
7
8
9
10
explain delete a from test_data a inner join  (select id from (select min(id) as id,update_time from test_data  group by update_time having count(1) > 1 ) as t)  d on d.id = a.id;
+------+-------------+------------+--------+---------------+-----------------+---------+------+---------+-------------+
| id | select_type | table | type | possible_keys | key | key_len | ref | rows | Extra |
+------+-------------+------------+--------+---------------+-----------------+---------+------+---------+-------------+
| 1 | PRIMARY | <derived2> | ALL | NULL | NULL | NULL | NULL | 1003893 | Using where |
| 1 | PRIMARY | a | eq_ref | PRIMARY | PRIMARY | 8 | d.id | 1 | |
| 2 | DERIVED | <derived3> | ALL | NULL | NULL | NULL | NULL | 1003893 | |
| 3 | DERIVED | test_data | index | NULL | idx_update_time | 7 | NULL | 1003893 | Using index |
+------+-------------+------------+--------+---------------+-----------------+---------+------+---------+-------------+
4 rows in set (0.000 sec)

执行计划提示1执行删除的时候使用了索引:

1
2
root@db 12:22:  [tmp_opa_user]> delete a from test_data a inner join  (select id from (select min(id) as id,update_time from test_data  group by update_time having count(1) > 1 ) as t)  d on d.id = a.id; 
Query OK, 81241 rows affected (4.120 sec)

删除8万条数据执行了4.1s

4、以上两种方法,3的方法会比2的方法快,尤其是在根据二级索引删除的时候,方法3比方法2提升N个档次

1
delete from test_data where update_time in (select update_time from (select update_time from test_data group by update_time having count(1) > 1 limit 1000) as t);
1
delete a from test_data a inner join (select update_time from (select update_time from test_data group by update_time having count(1) > 1) as t) d on d.update_time = a.update_time;

感兴趣的可以用这两个sql测试一下性能
5、扩展
如果感觉一次性删除数据量太大,可以使用limit来限制条数,例如:
delete a from test_data a inner join (select id from (select min(id) as id,update_time from test_data group by update_time having count(1) > 1 ) as t limit 1000 ) d on d.update_time = a.update_time;

点击阅读

[linux] confluence部署配置


1、 下载、解压安装包

wget https://product-downloads.atlassian.com/software/confluence/downloads/atlassian-confluence-7.0.2.tar.gz
tar -zxvf atlassian-confluence-7.0.2.tar.gz

2、进入解压完之后的路径,修改配置文件

cd /data/soft/atlassian-confluence-7.0.2
修改配置文件设置confluence启动的家目录
vim /data/soft/atlassian-confluence-7.0.2/confluence/WEB-INF/classes/confluence-init.properties

1
2
3
4

# confluence.home=c:/confluence/data
修改为
confluence.home=/data/soft/atlassian-confluence-7.0.2

修改端口,默认端口为8090
vim /data/soft/atlassian-confluence-7.0.2/conf/server.xml

1
2
3
4
5
6
7
8
9
10
11
12
13
14
<Server port="8000" shutdown="SHUTDOWN" debug="0">
<Service name="Tomcat-Standalone">
<!--
==============================================================================================================
DEFAULT - Direct connector with no proxy, for unproxied HTTP access to Confluence.

If using a http/https proxy, comment out this connector.
==============================================================================================================
-->
<Connector port="8090" connectionTimeout="20000" redirectPort="8443"
maxThreads="48" minSpareThreads="10"
enableLookups="false" acceptCount="10" debug="0" URIEncoding="UTF-8"
protocol="org.apache.coyote.http11.Http11NioProtocol"/>
<!--

server端口修改为5000,连接端口修改为5050

1
2
3
4
5
6
Server port="5000" shutdown="SHUTDOWN" debug="0">
<Service name="Tomcat-Standalone">
<Connector port="5050" connectionTimeout="20000" redirectPort="8443"
maxThreads="48" minSpareThreads="10"
enableLookups="false" acceptCount="10" debug="0" URIEncoding="UTF-8"
protocol="org.apache.coyote.http11.Http11NioProtocol" />

3、启动confluence

1
2
3
4
5
6
7
8
9
10
11
12
13
14
15
16
17
[root@dax-mysql-master atlassian-confluence-7.0.2]# ./bin/start-confluence.sh
To run Confluence in the foreground, start the server with start-confluence.sh -fg
executing as current user
If you encounter issues starting up Confluence, please see the Installation guide at http://confluence.atlassian.com/display/DOC/Confluence+Installation+Guide

Server startup logs are located in /data/soft/atlassian-confluence-7.0.2/logs/catalina.out
---------------------------------------------------------------------------
Using Java: /data/soft/jdk1.8.0_201/jre/bin/java
2019-10-08 16:46:05,152 INFO [main] [atlassian.confluence.bootstrap.SynchronyProxyWatchdog] A Context element for ${confluence.context.path}/synchrony-proxy is found in /data/soft/atlassian-confluence-7.0.2/conf/server.xml. No further action is required
---------------------------------------------------------------------------
Using CATALINA_BASE: /data/soft/atlassian-confluence-7.0.2
Using CATALINA_HOME: /data/soft/atlassian-confluence-7.0.2
Using CATALINA_TMPDIR: /data/soft/atlassian-confluence-7.0.2/temp
Using JRE_HOME: /data/soft/jdk1.8.0_201/jre
Using CLASSPATH: /data/soft/atlassian-confluence-7.0.2/bin/bootstrap.jar:/data/soft/atlassian-confluence-7.0.2/bin/tomcat-juli.jar
Using CATALINA_PID: /data/soft/atlassian-confluence-7.0.2/work/catalina.pid
Tomcat started.

4、破解confluence

上传atlassina-agent.jar破解包,下载链接
链接: https://pan.baidu.com/s/1XslwW8cdGRxVpnt3qigztQ 提取码: utp7

修改环境变量
vim conf/setenv.sh
`CATALINA_OPTS=”-javaagent:/data/soft/atlassian-agent.jar ${CATALINA_OPTS}”``
重新启动confluence

5、开始配置confluence

选择中文语言,选择产品安装
img1
点击下一步,如果勾选下面的选项,需要额外的破解步骤
img2
拷贝服务器ID,使用破解包,生成授权码
img3

在服务器端,执行下面步骤
java -jar /data/soft/atlassian-agent.jar -p conf -m zhangyuliang@new4g.cn -n zeven -o https://zeven0707.github.io -s BVQD-QO0A-IHZE-LJDV
命令行参数如下

1
2
3
4
5
-p conf(安装的是confluence产品)
-m aaa@bbb.com(随意写)
-n my_name(随意写)
-o https://zhile.io (随意写
-s B3N1-KDPW-IYEI-14CE (即当前的页面中显示的服务器ID)

生成下面的授权码

1
2
3
4
5
6
7
8
9
10
11
12
13
14
[root@dax-mysql-master soft]# java -jar /data/soft/atlassian-agent.jar -p conf -m zhangyuliang@new4g.cn -n zeven -o https://zeven0707.github.io -s BVQD-QO0A-IHZE-LJDV
====================================================
======= Atlassian Crack Agent =======
======= https://zhile.io =======
======= QQ Group: 30347511 =======
====================================================
Your license code(Don't copy this line!!!):
AAABSA0ODAoPeJxtUFFrgzAYfM+vCOw5Nto520JgnQpz2LrOtg97S91XDdgoSXRzv35W3R5GIRByl
zvu7m7fAE4yg+kC296Kuit3jv10jx1qL5GvgBtRyYAbYFeE2JTQBQpbXjYDw8681IAC0JkS9YAcZ
CkuwsAHLkUGUgM+dbgwptar2ey7ECVYokKJyrkUejT5Y6EFST3qWbkwRXO6fswqebZ4ZkQLzKgGk
F9J07/DDRcl+y64zLumFP31KOHzPrcyOWpSw5UBNSUcoHgMtO9q2PILMD/ZbMI3P1rHqHeTBiSXG
YRftVDd1HmxJNTrD5q0UcDiKEjDLYlt16Ou47ru/MFZohRUC6qnn467gOwSuibR83tI4pfg+Cu+7
fzaqKzgGv6vPM13BKWvIzljh21zOYFKzgfd44zYqM/CbuSZZhp6Drv+ABXDoAYwLAIUeI9iDGYa7
BtHTuFqLI3Wftm0uSsCFEpRGmgeBy1pr+YzJPwhxwfYiqVGX02g8

拷贝授权码到下面空白框
img4
下面配置自己的数据库
img5

先上传数据库连接工具mysql-connector-java-5.1.42-bin.jar,可以通过官网下载
链接: https://pan.baidu.com/s/1qzhLzqO5mdSyQPoqFPT6KQ 提取码: j5zq
配置数据库连接
img6

根据提示将连接包放到指定的目录
cp -rp mysql-connector-java-5.1.42-bin.jar /data/soft/atlassian-confluence-7.0.2/confluence/WEB-INF/lib/
重新启动confluence
再次刷新页面,页面如下所示
img7

创建一个新的数据库字符集必须为utf8、排序规则为utf8_bin,数据库隔离级别为read-commit

1
2
set global transaction_isolation='READ-COMMITTED';
create database confluence default character set utf8 collate utf8_bin;

img8
配置成功之后,点击示范站点
img9
点击在confluence中管理用户和组
img10
配置管理员密码
img11
开始使用confluence
img12
查看是否正常破解,点击空间目录
img13
一般配置
img14
授权细节
img15
结果如下所示
img16

6、衍生–配置博文开启匿名访问

点击一般配置
img17
全局权限
img18
编辑权限
img19
启用匿名用户可以反问confluence
img20
修改需要对外提供访问的空间(例如nginx),点击空间管理-权限
img21
img22
授予匿名用户查看权限
img23

点击阅读

[linux] nginx配置线程池(thread tool)


1、nginx配置是需要添加–with-threads参数

./configure --with-threads

2、在合适的上下文(http、server、location)配置 aio threads

in the ‘main’ context
thread_pool default threads=32 max_queue=65536;
in the ‘http’, ‘server’, or ‘location’ context
aio threads=default;
上面例子定义了一个名称为default的线程池,线程数为32个,最大任务队列为65536,如果任务队列超过负载,nginx会提示报错
thread pool "NAME" queue overflow: N tasks waiting

3、可以配置多个独立的线程池用于不通的配置文件使用:

in the ‘main’ context

1
2
3
4
5
6
7
8
9
10
11
12
13
14
15
16
thread_pool one threads=128 max_queue=0;
thread_pool two threads=32;

http {
server {
location /one {
aio threads=one;
}

location /two {
aio threads=two;
}

}
# ...
}

如果不指定max_queue,默认值为65536,上面例子设置为0,这种情况线程池只能处理和线程池数相等的任务,没有任务等待。

4、如果服务器有多块硬盘,可以使用分割用户+proxy_cache的方法提高性能

假设有三块挂载盘/mnt/disk1, /mnt/disk2, or /mnt/disk3
in the ‘main’ context

1
2
3
4
5
6
7
8
9
10
11
12
13
14
15
16
17
18
19
20
21
22
23
24
25
26
27
28
thread_pool pool_1 threads=16;
thread_pool pool_2 threads=16;
thread_pool pool_3 threads=16;

http {
proxy_cache_path /mnt/disk1 levels=1:2 keys_zone=cache_1:256m max_size=1024G
use_temp_path=off;
proxy_cache_path /mnt/disk2 levels=1:2 keys_zone=cache_2:256m max_size=1024G
use_temp_path=off;
proxy_cache_path /mnt/disk3 levels=1:2 keys_zone=cache_3:256m max_size=1024G
use_temp_path=off;

split_clients $request_uri $disk {
33.3% 1;
33.3% 2;
* 3;
}
server {
# ...
location / {
proxy_pass http://backend;
proxy_cache_key $request_uri;
proxy_cache cache_$disk;
aio threads=pool_$disk;
sendfile on;
}
}
}

点击阅读

[linux] nginx默认设置文件大小上传限制报错client intended to send too large body


1
[error] 15752#15752: *7501 client intended to send too large body: 1439319 bytes, client: 123.58.106.243, server: ebank.cbibank.com, request: "POST /innermanage/cbRegUploadFile.do?EMP_SID=GLFCEOHOJOFFCWDLAXHQJFAJHYDGDUAOCNBHAJCZ HTTP/1.1", host: "ebank.cbibank.com", referrer: "https://ebank.cbibank.com/innermanage/cbRegAddDetailInf.do"

打开nginx.conf并在http{}字段里添加 client_max_body_size 64M;

点击阅读

[linux] nginx try_files参数含义


为了解释它的含义举个栗子

1
2
3
location /test {
try_files $uri $uri/ /index.html;
}

使用try_files的意思就是当用户去请求地址http://www.test.com/test的路径时,如果存在这个目录,那么就直接将内容发送给用户,如果不存在test这个目录,就将这个请求跳转到http://www.test.com/index.html

如果指定的原始uri不存在,nginx做一个内部重定向,返回一个/www/data/images/default.gif

1
2
3
4
5
6
server {
root /www/data;
location /images/ {
try_files $uri /images/default.gif;
}
}

还可以指定status code

1
2
3
location / {
try_files $uri $uri/ $uri.html =404;
}

还可以指定转到proxy server

1
2
3
4
5
6
7
location / {
try_files $uri $uri/ @backend;
}

location @backend {
proxy_pass http://backend.example.com;
}

点击阅读

[linux]nginx配置alias注意事项


1、如果把alias配置在多层localtion下

1
2
3
4
5
6
7
8
9
10
location /inner {
location ~ /pub/notice {
alias /tmp/bankuser/pub/notice/;
#autoindex on;
#autoindex_exact_size off;
#autoindex_localtime on;
}
root /data/web;
index index.html;
}

1.1、在/tmp/bankuser/pub/notice/目录下不能存在index.html文件,如果存在index.html文件会报错

ERR_TOO_MANY_REDIRECTS

1.2、如果不存在index.html文件,则会提示403错误

1
2
403 Forbidden
openresty/1.13.6.1

日志会提示错误
directory index of "/tmp/bankuser/pub/notice/" is forbidden

1.3、为了不出现上面的错误,需要开启autoindex,配置如下

1
2
3
4
5
6
7
8
9
10
location /inner {
location ~ /pub/notice {
alias /tmp/bankuser/pub/notice/;
autoindex on;
autoindex_exact_size off;
autoindex_localtime on;
}
root /data/web;
index index.html;
}

1.4、但是当启用autoindex之后,访问该目录下的路径会出现下面异常

1
2
3
4
Index of /innermanage/pub/notice/test/test/test/test/
../
test/ 17-Sep-2019 02:11 -
1.html 16-Sep-2019 23:21 4

点击test目录无法进去。。。

2、配置alias在最外层的location

1
2
3
4
5
6
location  /pub/notice {
alias /tmp/bankuser/pub/notice/;
#autoindex on;
#autoindex_exact_size off;
#autoindex_localtime on;
}

2.1、如果存在index.html文件

http://localhost/pub/notice可以正常访问
http://localhost/pub/notice/1.html可以正常访问

2.2、如果不存在index.html文件

localhost/pub/notice访问提示403

1
2
403 Forbidden
openresty/1.13.6.1

http://localhost/pub/notice/1.html可以正常访问

2.3、修改配置启用autoindex

1
2
3
4
5
6
location  /pub/notice {
alias /tmp/bankuser/pub/notice/;
autoindex on;
autoindex_exact_size off;
autoindex_localtime on;
}

2.4、如果存在index.html

localhost/pub/notice可以正常访问
http://localhost/pub/notice/1.html可以正常访问

2.5、如果不存在index.html

localhost/pub/notice访问页面如下

1
2
3
4
Index of /pub/notice/
../
test/ 17-Sep-2019 02:11 -
1.html 16-Sep-2019 23:21 4

http://localhost/pub/notice/1.html可以正常访问

3、总结

根据上面实验,如果配置alias参数,建议将放在location的一层结构下,一旦放到多层目录结构内,会出现各种异常。

点击阅读

[linux] openresty V1.15.8安装


1、安装先决条件

需要安装perl 5.6.1+ libpcre libssl,确保ldconfig命令在PATH环境变量下
yum -y install epel-release
yum -y install vim wget lrzsz pcre pcre-devel openssl openssl-devel zlib zlib-devel telnet lua luajit gcc gcc-c++ axel curl unzip

2、下载软件包

1
2
3
4
mkdir -p /data/soft
cd /data/soft
wget http://openresty.org/download/openresty-1.15.8.1.tar.gz
tar zxvf openresty-1.15.8.1.tar.gz && cd openresty-1.15.8.1

3、下载第三方包

1
2
3
4
5
6
7
8
cd /data/soft
wget http://labs.frickle.com/files/ngx_cache_purge-2.3.tar.gz
tar -zxvf ngx_cache_purge-2.3.tar.gz

cd /data/soft
wget https://codeload.github.com/yaoweibin/nginx_upstream_check_module/zip/master
unzip master
mv nginx_upstream_check_module-master nginx_upstream_check_module

4、编译安装

1
2
3
4
5
6
7
8
9
10
11
12
13
14
15
16
17
18
19
20
21
22
23
24
25
26
27
28
29
cd openresty-1.15.8.1

./configure \
--prefix=/usr/local/openresty \
--with-luajit \
--user=nobody \
--group=nobody \
--with-threads \
--with-file-aio \
--with-http_realip_module \
--with-http_sub_module \
--with-http_gunzip_module \
--with-http_gzip_static_module \
--with-http_auth_request_module \
--with-http_random_index_module \
--with-http_secure_link_module \
--with-http_slice_module \
--with-http_ssl_module \
--with-http_stub_status_module \
--with-stream \
--with-stream_ssl_module \
--with-http_v2_module \
--with-http_flv_module \
--with-mail=dynamic \
--add-module=/data/soft/ngx_cache_purge-2.3 \
--add-module=/data/soft/nginx_upstream_check_module

shell > gmake && gmake install
shell > ln -sf /usr/local/openresty/bin/openresty /usr/bin/openresty

修改linux配置参数

sudo sysctl -w net.core.somaxconn=4096

在/etc/sysctl.conf末尾追加内容

net.core.somaxconn = 4096
echo "net.core.somaxconn = 4096" >> /etc/sysctl.conf

点击阅读

[linux] linux使用mtr排查网络故障


1、mtr参数详解

mtr工具的主要作用是在于两点丢包时候的异常点排查及路径搜集,是ping和tracert的结合。 相比于ping它会有路由节点的展示,而相对于tracert它会展示中间路由节点的丢包情况,可以根据丢包梯度情况简单分析出可能的异常节点并向对应运营商进行反馈。

由于骨干外网路径可能存在的异步路由(即数据包来回路径不一致,可能在某一方向看无明显异常点,另一方向才会显示异常)与ECMP(运营商在多根路径上做负载均衡,某一根异常导致部分IP丢包),建议提供双向mtr。

下载安装
centos系统可用 yum install -y mtr 安装,其他操作系统建议采用相关下载工具

2、运行命令

1
mtr 13.71.139.151

3、运行结果

1
2
3
4
5
6
7
8
9
10
11
12
13
14
15
16
17
18
Host                                                                                                                                                               Loss%   Snt   Last   Avg  Best  Wrst StDev
1. 172.27.169.229 66.5% 158 2.3 2.2 1.4 12.5 1.4
2. 172.27.192.144 65.8% 158 1.6 1.9 1.2 17.0 2.0
3. 172.31.145.132 0.0% 158 0.8 0.8 0.7 1.6 0.0
4. 172.31.144.217 0.0% 158 1.5 9.2 1.3 168.5 21.1
5. 10.1.251.5 0.0% 158 1.6 6.8 1.4 155.3 19.1
6. ???
7. 36.110.169.21 15.8% 158 4.0 3.8 2.9 8.7 0.4
8. 218.30.28.13 8.2% 158 2.5 2.8 2.3 36.1 3.7
9. 218.30.28.53 0.0% 158 3.5 3.5 3.3 7.6 0.3
10. 202.97.48.246 6.3% 158 14.9 12.8 2.9 21.0 5.6
11. 202.97.12.50 7.0% 158 15.8 16.3 5.1 26.5 6.6
12. 202.97.89.50 3.8% 158 54.5 50.3 37.7 59.4 6.1
13. 183.91.34.126 0.0% 158 38.0 38.6 37.9 61.6 2.5
14. ae24-0.icr01.hkg20.ntwk.msn.net 0.0% 158 39.4 40.2 39.0 74.5 4.1
15. be-120-0.ibr02.hkg20.ntwk.msn.net 0.0% 158 87.5 87.7 87.3 89.4 0.1
16. be-5-0.ibr02.tyo31.ntwk.msn.net 0.0% 158 88.1 88.4 88.1 89.3 0.0
17. ae120-0.icr01.tyo31.ntwk.msn.net 0.0% 158 88.9 89.8 88.6 110.2 3.1

点击阅读

Proudly powered by Hexo and Theme by Lap
本站访客数人次
© 2020 zeven0707's blog